Step-by-step instructions on how to set up an automatic enrolment offer expiry reminder for parents using EnrolHQ.
Set Up the Trigger time
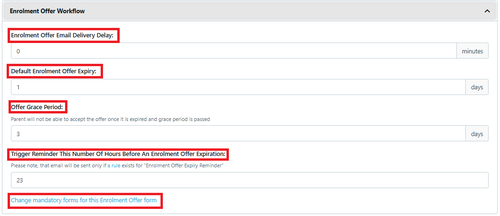
- Settings > School Details > Enrolment Offer Workflow > Trigger reminder this number of hours before an Enrolment offer expiration.
- Set this to the desired values
- Save
You can also adjust the number of hours from automation.
Note: 168 hours is 7 days
The automation timing only works when the trigger has not passed.
If you have had an offer but the automation was not in place then it will not send the reminder and will have to be completed manually.
Set Up the Email Template
- Email Settings > Templates > Custom
- Set up a Primary Custom offer reminder email to send to Parents
Copy and Paste (Ctrl+C, Ctrl+Shift+V) directly into the template and add your school specific language/vernacular:
{% if non_user_parent.last_name and user_parent.last_name == non_user_parent.last_name %}
Dear Mr and Mrs {{ user_parent.last_name }},
{% else %}
Dear {{ user_parent.title }} {{ user_parent.last_name }} {% if non_user_parent.last_name %} and {{ non_user_parent.title }} {{ non_user_parent.last_name }},{% endif %}
{% endif %}
This is a friendly reminder that the {{ enrolment_offer_label }} for {{ profile.first_name }} to commence at {{ school.settings.name }} in {{ profile.entry_grade_label }} {{ profile.entry_year }} is expiring on {{profile.progress.enrolment_offer.expiry_date|date:"l j F Y" }}.
To accept the offer please log in to the Parent Dashboard using your {{ user_parent.email }} email address {% if profile.progress.enrolment_offer.payment_cost %} and follow the prompt to pay your Enrolment Acceptance fee of ${{ profile.progress.enrolment_offer.payment_cost }}{% endif %}.
If you wish to withdraw your {{ profile.gender|gender:"plural" }} application, please contact me on {{ school.settings.telephone }} or via email {{ school.settings.email }}.
Create an Automation
To read how to create an automated email please click here: Create Automated Emails
- Automation > Add
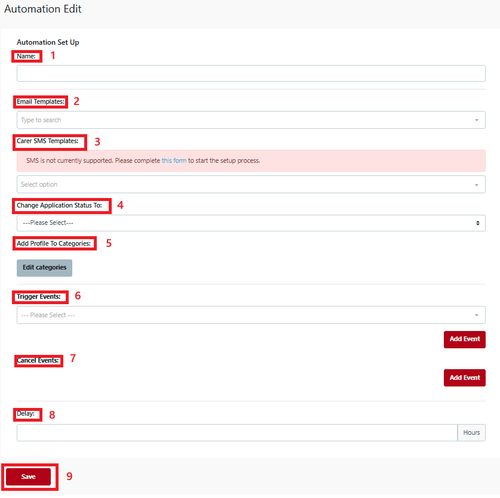
- Name - Automated name like ‘Offer Expiry Reminder Carer’ this makes it easier to identify.
- Email Template - Select your template from the ‘Custom Template’ dropdown so the email goes to the Primary and/or Secondary Carer, Staff or Payee
- Carer SMS template - Select your template from the ‘SMS Template’ dropdown so the SMS goes to a parent if setup
- Change Application Status - Select the Enrolment Journey stage this Automation will move the student profile to (e.g. if Pre-interview form is received - change status to Interview) if applicable
- Add to Student Profile Category - you can add settings to the Student Profile Category via the Automation process if applicable
- Trigger Event - select ‘Enrolment Offer Expiry Reminder’
- Cancel Event - select ‘Enrolment Offer Completed/Paid’
- Delay - Set to be 0 hours. This means the email will be sent to the parent according to the Trigger time
- Save.
Choose Automation Recipients allows you to select specific groups based on the options shown (optional)
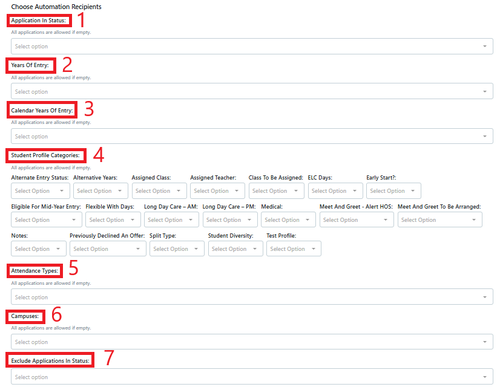
In an automation all of these selections are optional
- Application in Status - this should be Enrolment Offer
- Years Of Entry
- Calendar Years of Entry
- Student Profile Categories
- Attendance Types
- Campuses
- Exclude Application in Status
- Save
The automation timing only works when the trigger has not passed.
If the automation was not in place then it will not send the reminder and you will have to complete the steps manually.
Note: All offer reminders should have the status set to Enrolment Offer (or your equivalent) and a Cancel Trigger of Offer Completed/Paid should always be included.