Every record in EnrolHQ has a Student Profile where you can find all the information regarding this particular student's enrolment.
Student Profile
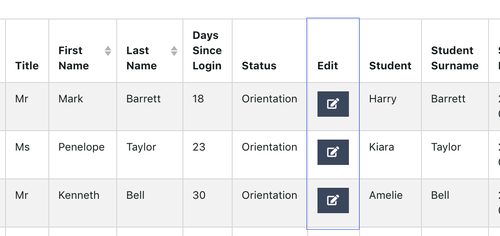
To view an individual student profile there is a small blue ‘Edit’ button for each record in the table. This will take you the student profile detailed view with all the information and tools you need for managing a future student.
The important thing to note about EnrolHQ is that every parent who fills out a form will have a student profile created and from there, subsequent forms that the parents fill out will keep adding to the profile that has been created. All the data is in one place and keeps getting updated.
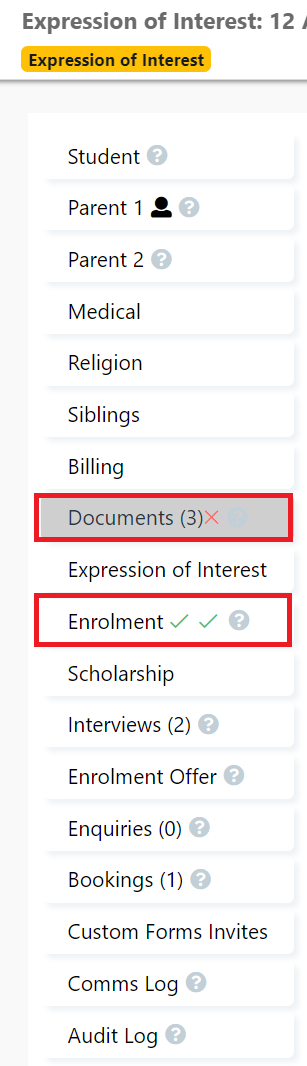
Student Profile Tabs
The Application tab settings default is on the left land side however if you prefer you can show across the middle of the screen. The order of the fields can be customised for each user (see User Column Customisation System and Individual )
Depending on your schools setup the names for the forms will change to match changes completed in Settings > Customisation
Student Profile - with personal details, citizenship details, residential details, learning abilities and further information and ‘How did you hear about us?’. Within each subsection, fields are shown for editing depending on your ‘Form Field Settings’. For example, some schools may choose to collect a student photo at Enrolment and this will be shown in the “Personal Details” tab.
Parent 1 - all personal details for Parent 1 plus Contact Details, Religion/Nationality and MCEETYA data collection. If Parent 1 is an ex-student it will show at the bottom of this tab.
Parent 2 - all personal details for Parent 2 plus Contact Details, Religion/Nationality and MCEETYA data collection. If Parent 2 is an ex-student it will show at the bottom of this tab.
Medical - the Medical Tab will contain the future students Medicare details, Immunisation History Statement Upload, Doctor’s Details and Emergency Contacts
Religion - if your school has enabled the ‘Religion’ block of the Enrolment form, then you will find Baptism/Parish related data in this tab.
Siblings - if the parent has entered any Siblings (whether they attend your school or not), these will be found here
Questionnaire - if your school has enabled the ‘Questionnaire’ part of the Enrolment form, then you will find the answers provided by the parents here for questions such as ‘Why do you want to enrol your child at our school/college?’
Enquiries - if the parent has submitted an enquiry form (or multiple enquiry forms) the enquiries will be listed here.
Bookings - if the parent has booked into a school event/tour, their bookings will be shown here including which event they've booked into, who the attendees will be. If you want to move a family from one event to the next because they can't make it, use the Event dropdown to choose the event they wish to book into and then save.
Expression of Interest - if the parent has submitted an Expression of Interest form along with a payment, the details of the submission will be shown in this tab. If your school has ‘Waitlist’ style forms going back in time, you can enter in a ‘Manual Waitlist Submission’ date which will help keep that student profile in its original priority queue.
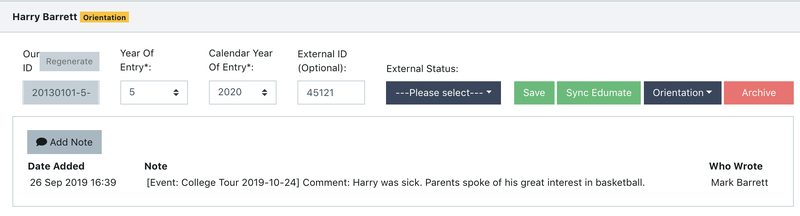
Enrolment - all the enrolment details and controls for managing an enrolment post form submission. This is explained in detail in the Enrolment Tab section
Comms Log - this tab lists all the previous emails that have been sent by the EnrolHQ system to the future students family. It gives you a quick history of all interactions the parents have had with the school so far. You can also add manual entries to record any phone calls or emails that you send personally.
Interview - this tab shows the school admissions interview related questions and any bookings the parents have for a school interview. It is explained in more detail in the interviews section
Custom Forms - Each completed custom form for that student is listed - all completed custom forms can be viewed in Reports - Custom Form Submits
Notes
Notes record the date the note was made, the note itself and who wrote the note so you can build up a ‘case history’ for each family. These notes are never shown to the parents/student, they are meant for office staff use only and help you work as a team OR let you put notes to remind you about the history of a particular family.
To see all the recent notes you have left against Student Records, you can go to Reports > Comments and that will list all the student records you have worked with and the most recent note left against that record.
Comms Log
The Comms Log lists all communication from from EnrolHQ to families.
There are 4 options available
Add Activity
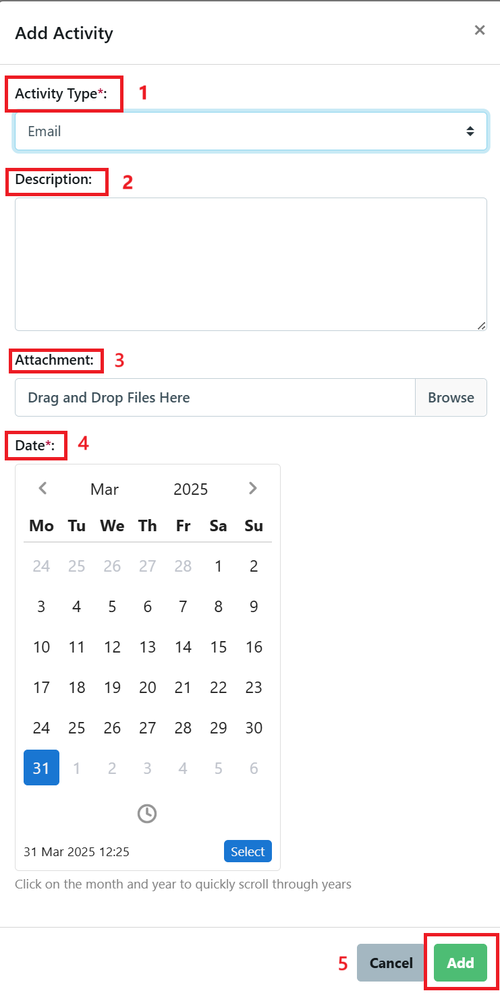
1 Activity type - mandatory -this is a fixed drop down menu
2 Description - summary of the action completed
3 Attachment - drag and drop a document (eg parent email) to the Comms log
4 Date - mandatory - select the date of the activity ( this can be made to match the attachment)
5 Add - to add the activity to the Comms log
Send Email
Select the template from the custom list to email a family individually ( these are the same templates available in Bulk Actions)
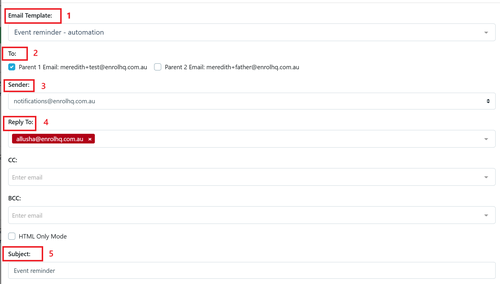
1 Custom Template search - start typing to view all available templates
2 To - Select the recipient of the email ( this is setup in the template but can be changed when sending)
3 Reply to - the email address that any response from the parent will be sent to ( setup in settings > Campus)
4 Subject - email subject as seen by recipient's of the email ( this is setup in the template but can be changed when sending)
Send Marketing Email
Select the template from the marketing template list to email a family individually ( these are the same templates available in Bulk Actions) - the difference between these and Send Email is the ability to "Opt out" which is a legal requirement for marketing emails.
Assign Task
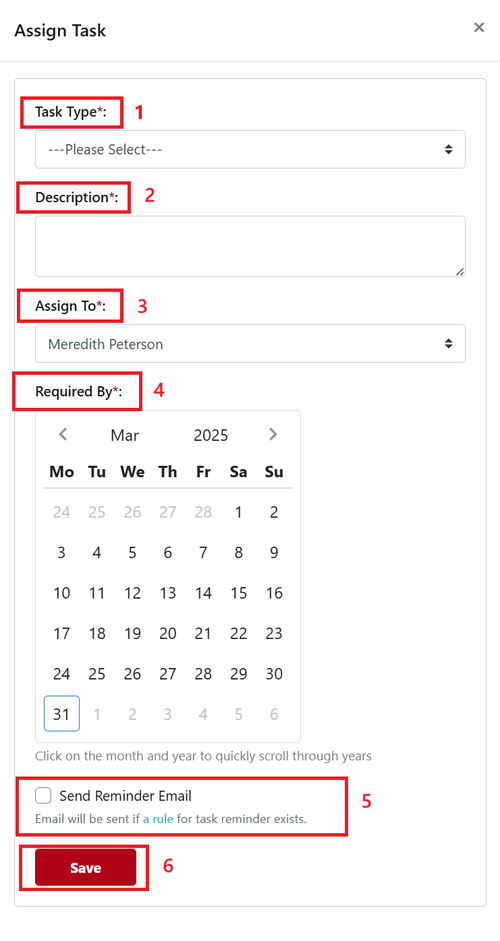
1 Task Type - mandatory -this is a fixed drop down menu
2 Description - mandatory - action to be taken by the person assigned the task
3 Assign To - mandatory - the person assigned the task
4 Required by - mandatory - date for action to be completed by the person assigned the task
5 Send Reminder email - optional if setup
6 Save to set the task