Custom forms are used to gather additional data at various stages, including during the Offer of Enrolment process, the onboarding phase after an offer is accepted, or at any other time in the Enrolment Journey. Some examples for Custom Forms are Photo Permission, Billing Details, Data Verification and Student Medical Information. By definition these forms are flexible and can be used during any part of the enquiry/application process. Custom forms can also be set up to request payments (for example a Playgroup Application).
Custom Forms and STUB's
- When you view custom forms you will now have the ability to duplicate any existing form.
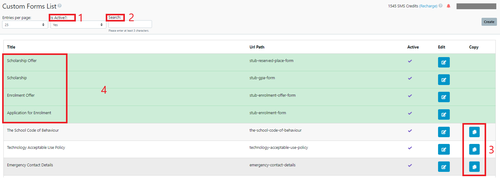
1 Is Active - this option allows you to view Active and Inactive forms separately.
2 Search - this allows you to search for a custom form by name.
3 Duplicate - this allows you to duplicate any existing Custom Form and modify the details. (you must rename the Title Field and the URL Path)
4 Custom Forms in Green - these are stubs and are where you set the Mandatory custom forms. This is also where you can customise your Form for Campus Specific Settings. Your introductory HTML is now located here for all Forms
Create a new custom form - design and information
The custom form setup section has toggles to allow you to force parents to complete these task prior to a particular event, for example if you turn on the toggle it ensures that the applicant must complete the form before going on to additional enrolment tasks.
( Note: you can create New Custom Forms and adjust the settings using the Copy JSON method however you will still need to do the initial setup first, see article Custom Form Templates
Create a New custom Form
Select create

These are mandatory fields you must add before you can start the form field section of a custom form.
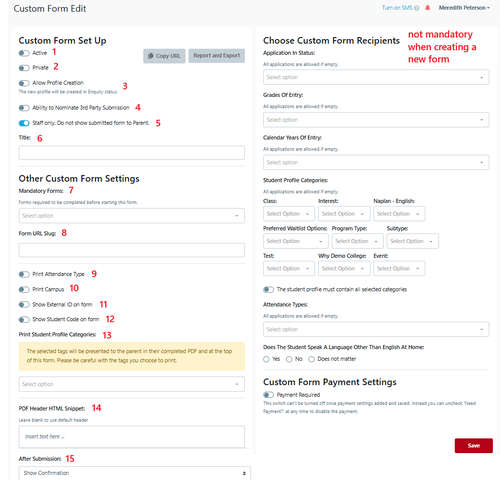
- Active - default is inactive ( you cannot make a form active until a form has been saved) To make a Custom form unavailable on the parent dashboard you can turn the form off here.
- Private - default if off (if you use Private for a Custom Form you cannot use the Custom Form Report) This option is used to send to a family you must add the URL link to an email
- Allow Profile Creation - default is off (this allows a Custom form to create a student profile - i.e. a Scholarship application)
- Ability to Nominate 3rd Party Submission - default is off - the form can be emailed to an external email address provided for completion- please go to How to Enable and Use 3rd Party Custom Forms for Schools for more details about how to use this functionality.
- Staff Only - default if on (this restricts the parent from seeing the completed for on their dashboard)
- Title - This is the name of the Form as displayed on the Parent Dashboard
- Mandatory Forms - you may nominate forms that must be completed prior to this form. i.e. application must be completed before completing a Pre-Interview form Note: that the form must already exist to be selected.
- Form URL Slug - this is the form name (no capital letters or spaces i.e. medical-update)
- Print Attendance Type - default is off (adds this information to the form)
- Print Campus - default is off (adds this information to the form)
- Show External ID on Form - default is off (adds this information to the form where External ID = the School Management System, e.g TASS etc)
- Print Student Code - default is off (adds this information to the form)
- Student Profile Categories - if added this information will be show to the parent at the top of the form.
- PDF Header HTML Snippet - default blank will use the system default. this is displayed prior to the parent starting the form and is usually an explanation about the purpose of the form an a prompt about any documents that may be required.
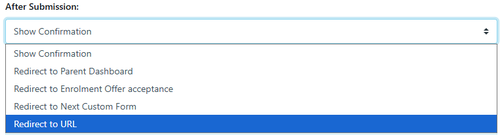
- After Submission - default is show confirmation on the screen, different options are:
Campus Look and Feel - optional
If a School has more than 1 campus you can add different customisation for a better parent experience.
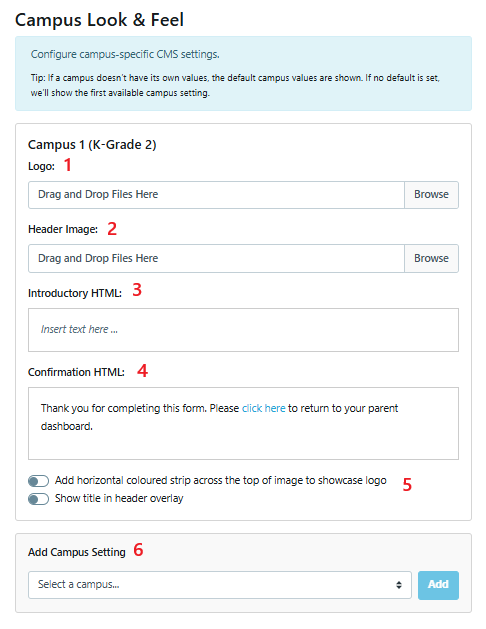
- Logo: if no additional logo is added then the default logo (setup in Campus is used)
- Header image: if no additional image is added then the default image Recommended sizing is 1920 x 288px or 1600 x 288px (setup in Campus is used)
- Introductory HTML: If no additional information is added then the information setup in the custom form step 14 (above) is displayed.
- Confirmation HTML: If no additional information is added then default in custom form step 15 (above) is used.
- For a different look on a form for you parents you can use these additional options
- Add Campus Setting if required for a form to only be available for a specific campus
Schema Editor
When starting a new form you need to add a step and a form field or design option before the system allows you to save. i.e. you cannot save a custom form until you have selected one of the components below.
- Step
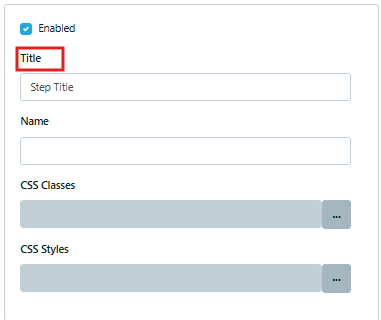
When you add the Step name it is displayed on the left of the Custom Form as a step for parents to follow (i.e do not use the same name as the Custom Form name)
Types of design options: these options are not mapped to form fields in the various sections of EnrolHQ.
Note: It is strongly recommended that you try to use the Student Forms and Parent Forms first.
Here is a short video explaining how these form fields - Video - How to Add Blocks to Custom Forms
- Text Input - opens a text space with label (short answer)

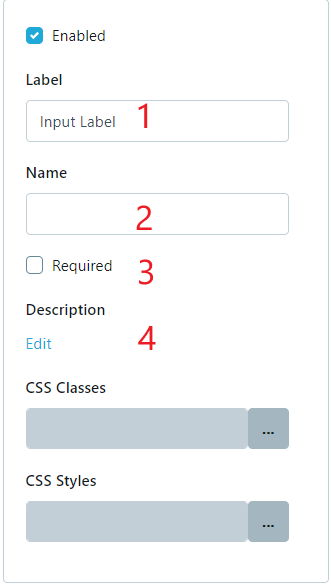
1 - The description / question displayed in the form
2 - The name of the file (limited to 64 characters linked by _ no spaces). this can be edited to reduce the size and not affect the Label
3 - This toggle makes the field Mandatory
4 - This is the description displayed under the #1
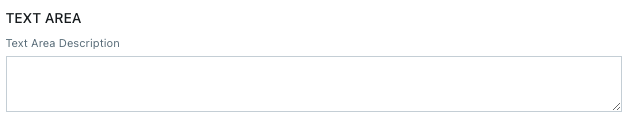
- Text Area - opens a text space without label (long Answer)
- Select - dropdown menu (options hidden until selected)

- Radio Group - questions with one answer allowed (options shown)

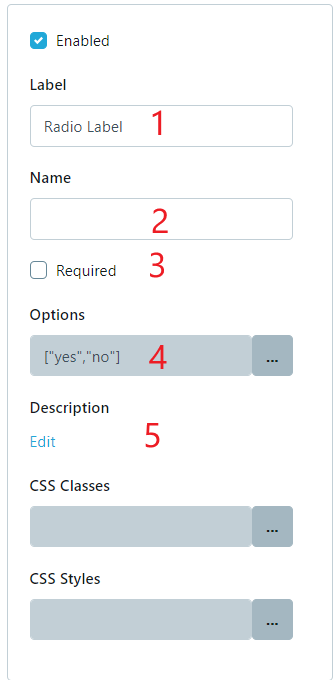
1 - The description / question displayed in the form
2 - The name of the file (limited to 64 characters linked by _ no spaces). this can be edited to reduce the size and not affect the Label
3 - This toggle makes the field Mandatory
4 - List the options to be selected (only one can be selected)
5 - This is the description displayed under the #1
- Checkbox Group - questions with multiple answers allowed (options shown)
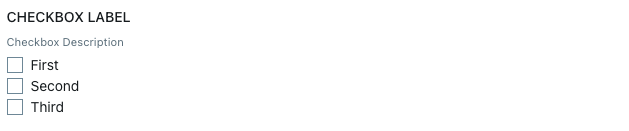
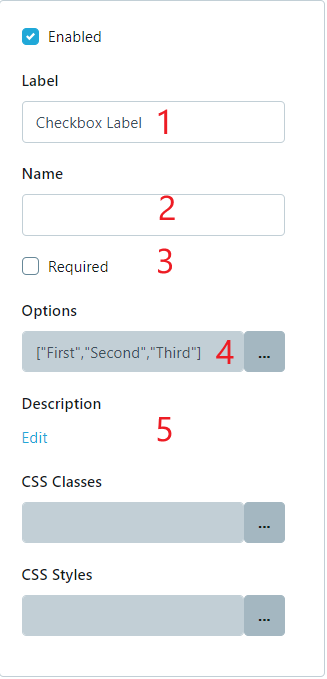
1 - The description / question displayed in the form
2 - The name of the file (limited to 64 characters linked by _ no spaces). this can be edited to reduce the size and not affect the Label
3 - This toggle makes the field Mandatory
4 - List the options to be selected (multiple options can be selected)
5 - This is the description displayed under the #1
- HTML - Text only - this can be formatted using HTML or WYSIWYG
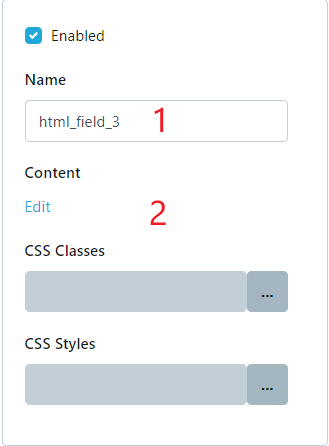
1 - The name of the field
2 - This is the description displayed under the #1
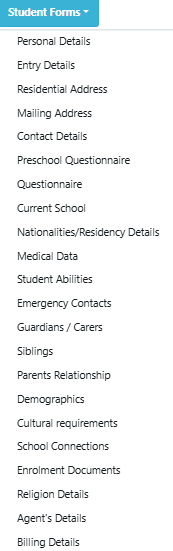
- Student Forms - select the relevant form field, make sure you edit the Form Field to select which field you want to be displayed on each form (granularity)
- Parent Forms - select the relevant form field, make sure you edit the Form Field to select which field you want to be displayed on each form (granularity)
Note: you must add the Parent 2 not applicable form field after the parent signature to ensure divorced parents can be sent the link to sign the form.
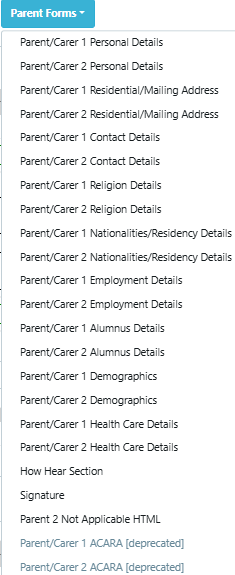
Split signatures are a common issue with Custom Forms - you can add the Parent 2 Not Applicable HTML to your custom form before and Parent/carer 2 details - this will allow the signature rules to split the signatures on the form. A short video on how split signatures are based on Settings Video - Split Signatures
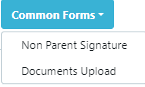
- Common Forms - select different options. For example Non Parent Signature or Document Upload (where the document does NOT exist in Form Fields).
You can switch the location of the steps you add by dragging them up and down as you please.
Please note: you do not need to complete the Choose Custom Form Recipients when first creating a Custom Form.
Make sure that you setup Recipients section PRIOR to making the form Active
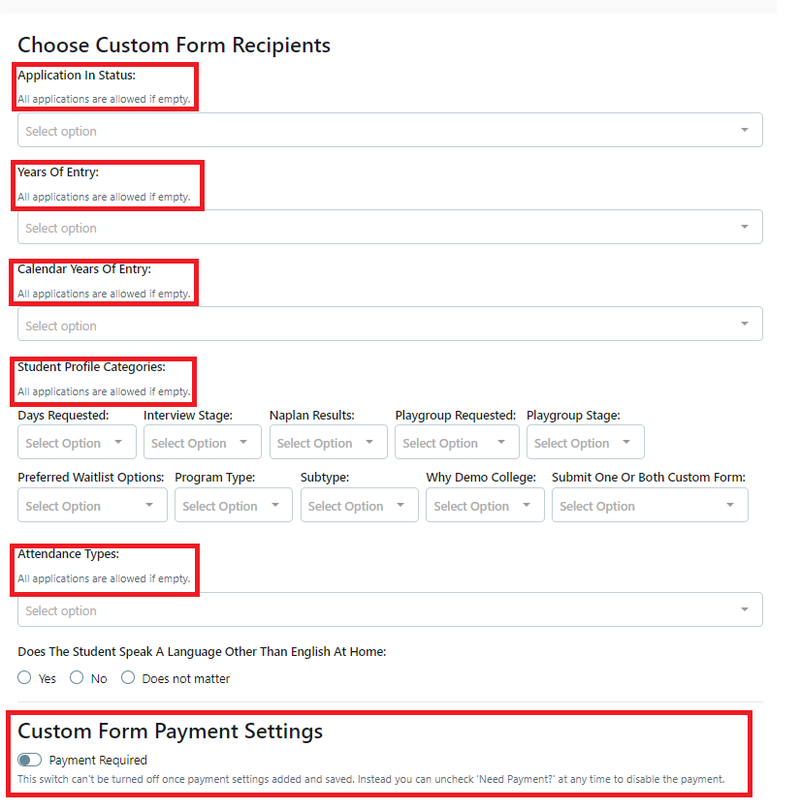
Choose Custom Form Recipients
Custom Form Recipients
This allows you to make custom form available depending on your requirements/selections
Note: if you do not select any Criteria then the forms are available for all.
This is also where you can activate Custom Form payment settings.
When you preview a Custom Form the "Introductory Snippet" will not display. To view this the form must be active, you can use the URL link to view the finished form.
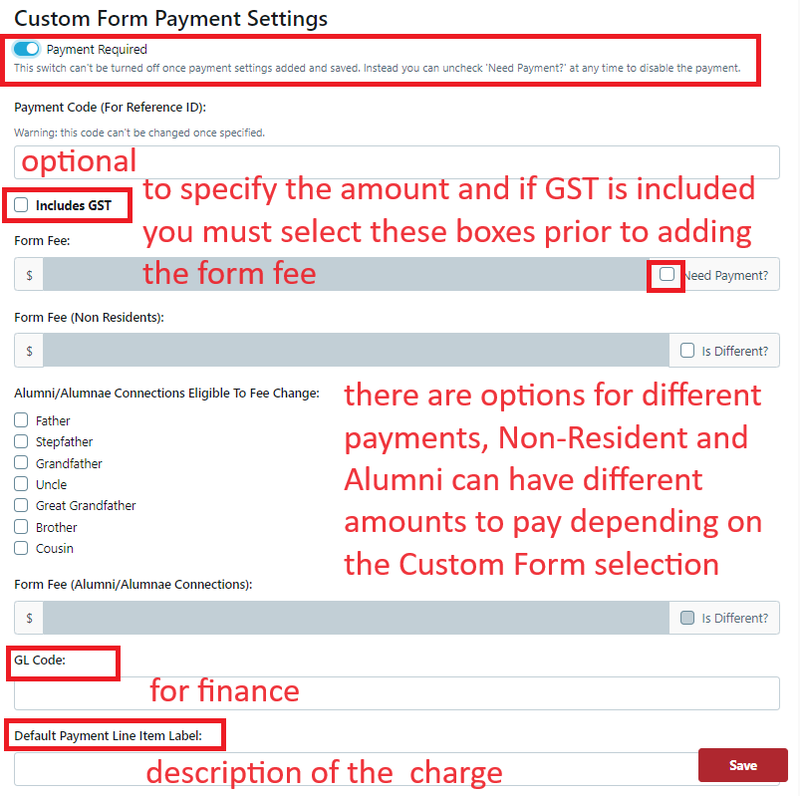
Setup Custom Form Payment
- Select the toggle to activate Custom Form payments. (Your Payment Gateway must already be setup see: <link: Payment Settings> )

- Once you have made your selections press save - remember it will not be available unless the form has been activated by selecting "Save and Publish".
2 - Create an email template with confirmation to the parent for the received form
Go to Email Settings > Email Templates > Custom > Add
Choose Group (Folder) Custom
Choose Type choose Custom
Choose Recipient

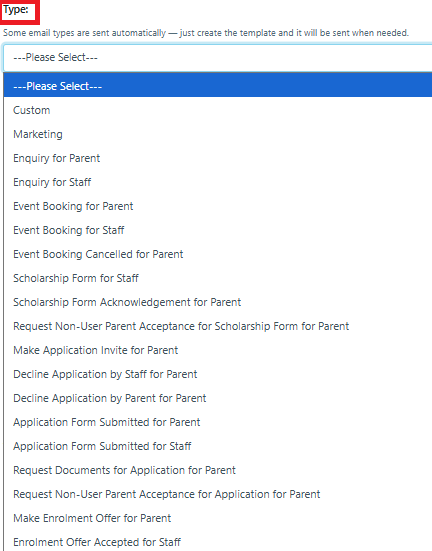
Here is a list of the Types of Email templates you can create
Note: you must make sure that the are added to the correct group
Input the email text you would like to send when a parent receives confirmation of submission. Create Custom Emails
3 - Create an automation setting that enables the system to send out the email template in step 2 automatically when a parent submits the custom form assigned to it.
Go to Email Settings > Automated Emails and click Create Email Automation
- Name
- Email template (staff and parent)
- Carer SMS (if active)
- Change Application status (if required)
- Add Student Profile Category (if required)
- Trigger Events - select that submitting a custom form is the trigger event
- Custom form - select which custom form is the trigger event
- Cancel Events - select if applicable
- Delay - Set to 0 to send the email immediately
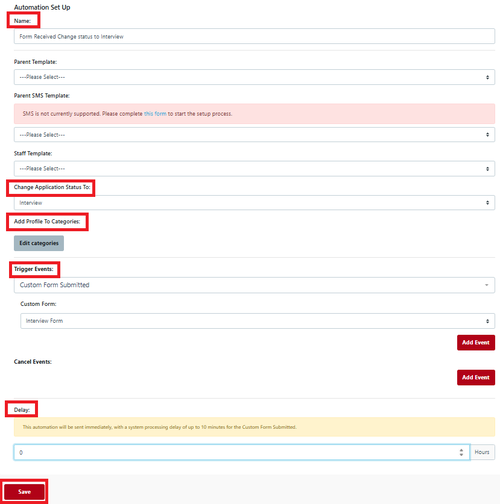
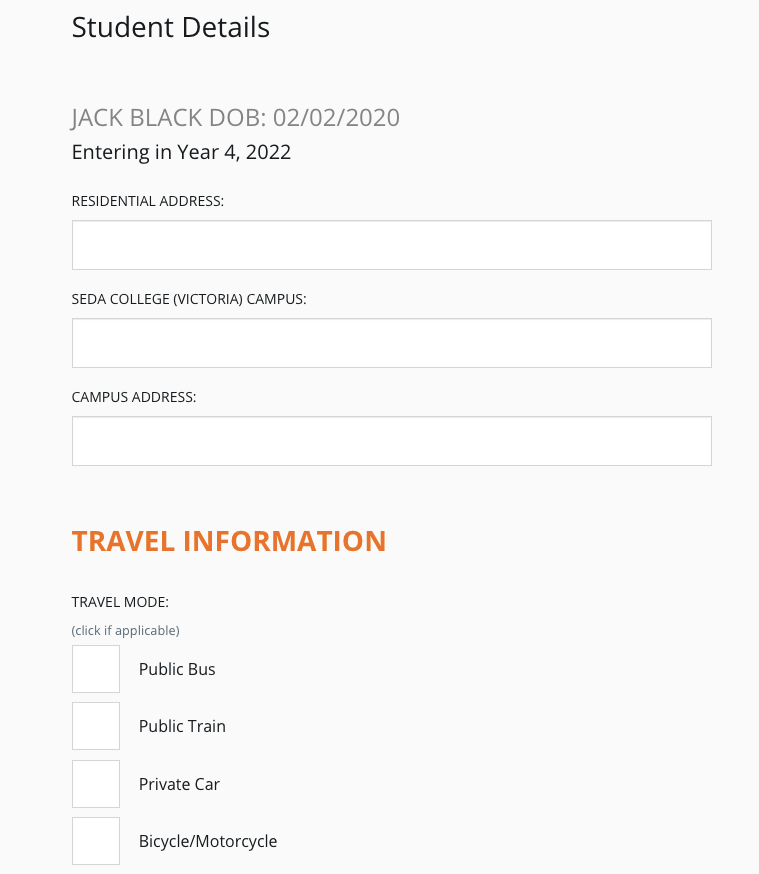
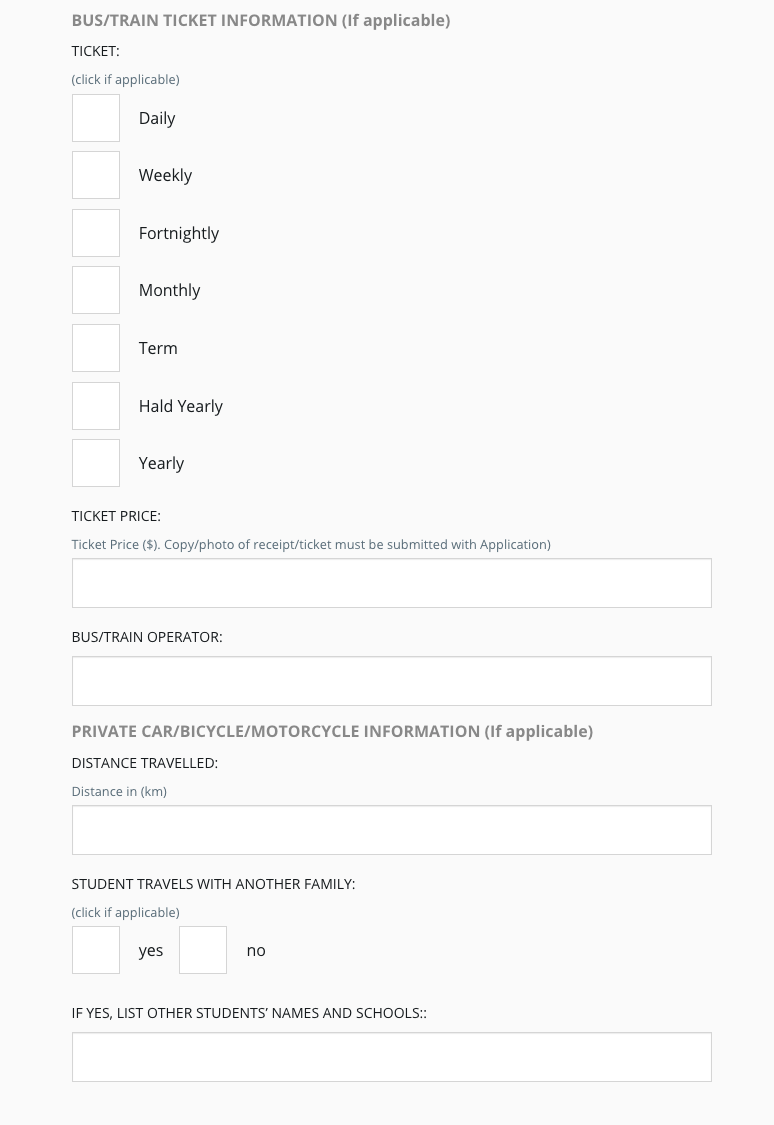
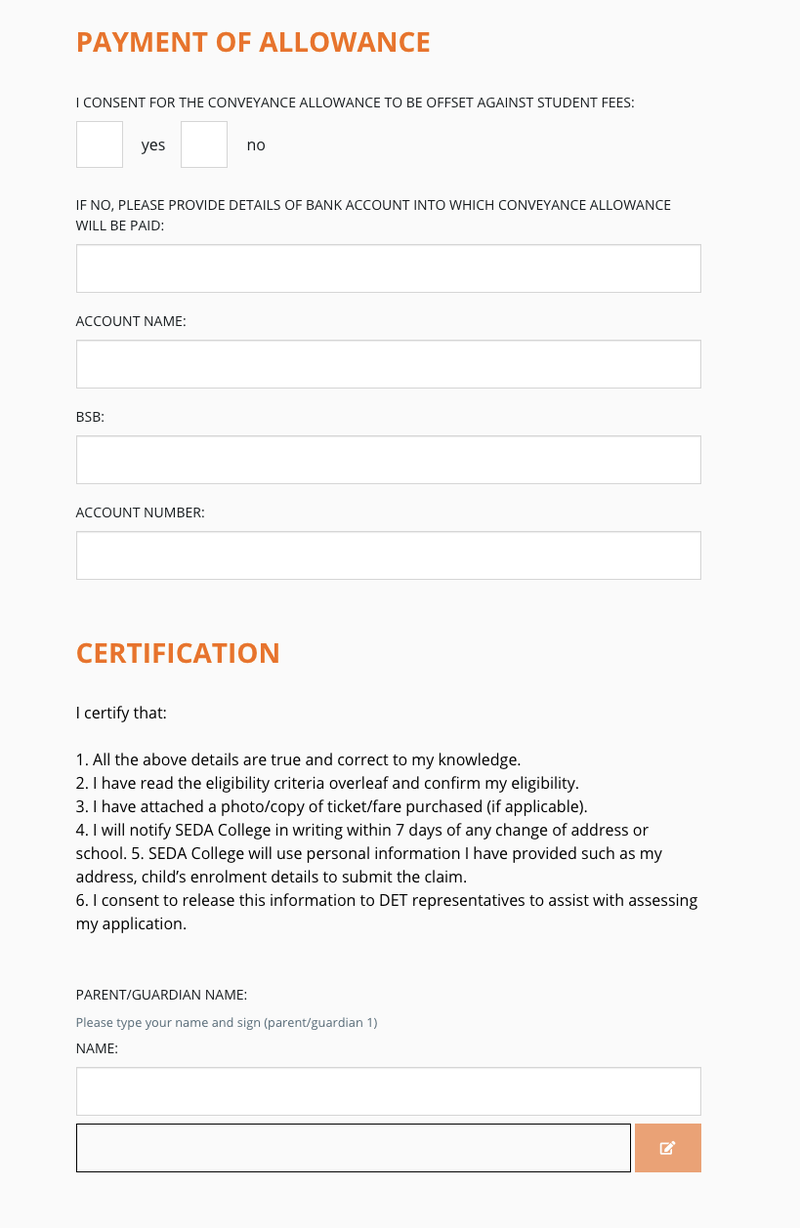
Below is an example of a completed custom form: