Instructions on how to configure EnrolHQ and Azure Active Directory to provide SSO to staff users
How To: Integrate EnrolHQ with Microsoft Entra (previously Azure) Active Directory SSO
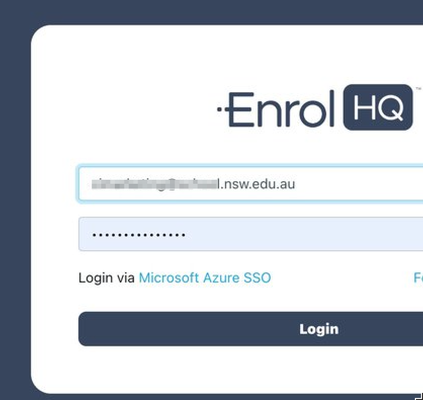
School Staff users of EnrolHQ (Registrars, Finance, IT Admins) can now use their Microsoft Entra (previously Azure) AD credentials to sign-in to their EnrolHQ dashboard instead of using their EnrolHQ specific username/password and SMS for 2FA. This provides IT teams better control over who accesses the dashboard and a more streamlined user experience for staff.
In summary, to setup EnrolHQ with Microsoft Entra (previously Azure) AD you will need to:
- Create a new custom Enterprise Application in Microsoft Entra (previously Azure) and use SAML as the sign-on method
- Enable SAML Authentication in EnrolHQ and add the App Federation Metadata URL to EnrolHQ
- Add the SAML URLs to the Azure Enterprise Application
- Setup the "Attributes & Claims" in Microsoft Entra (previously Azure)
- Add Users and Groups to the "EnrolHQ" Microsoft Entra (previously Azure) App
- Test
Step 1: Create Custom Enterprise Application in Microsoft Entra (previously Azure)
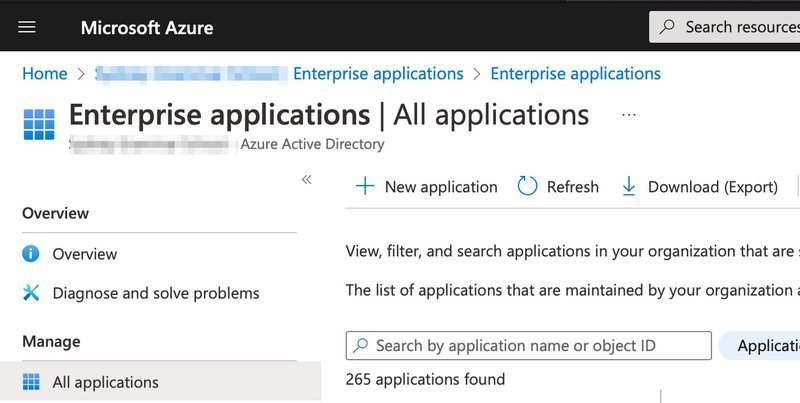
1a) Go to Microsoft Entra (previously Azure) Enterprise Applications and click the + New application button
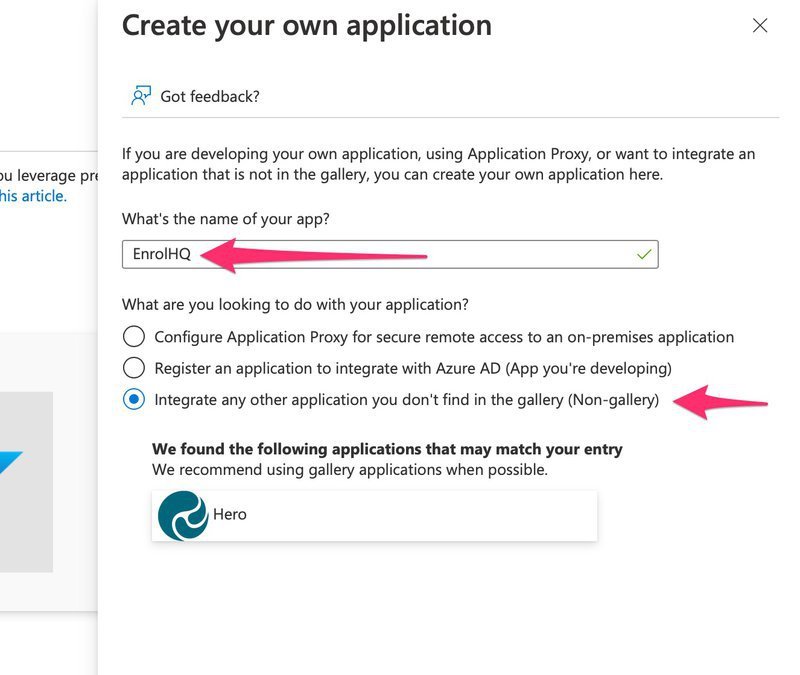
1b) A panel will slide out from the right, you will need to name the Application "EnrolHQ" and then choose the "Integrate any other application you don't find in the gallery (Non-gallery)" option. Scroll to to the bottom and save.
1c) After you create the application you should see an 'Overview' screen like this:
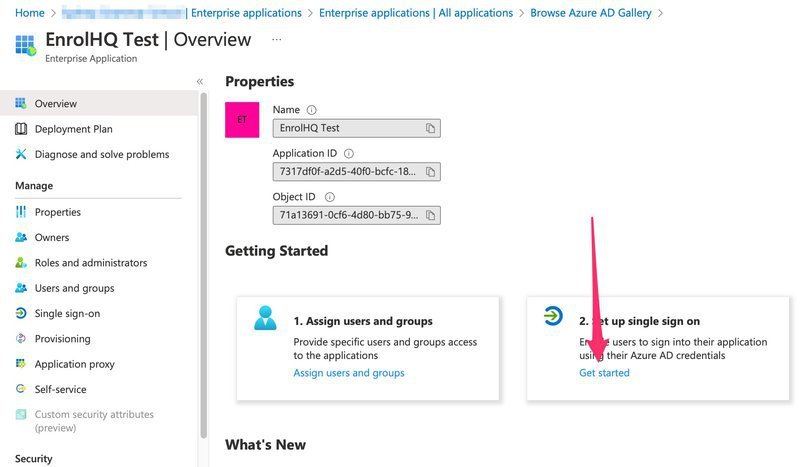
Click on the 'Get started' to set-up single sign-on.
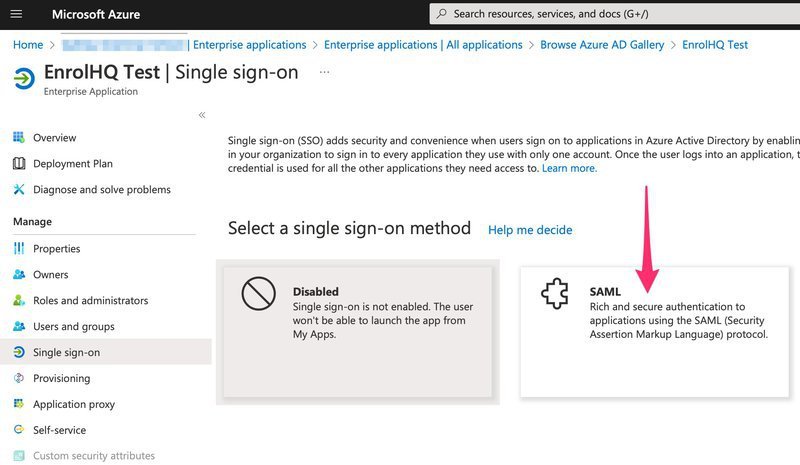
1d) You'll now be able to choose 'SAML' as the single sign-on method.
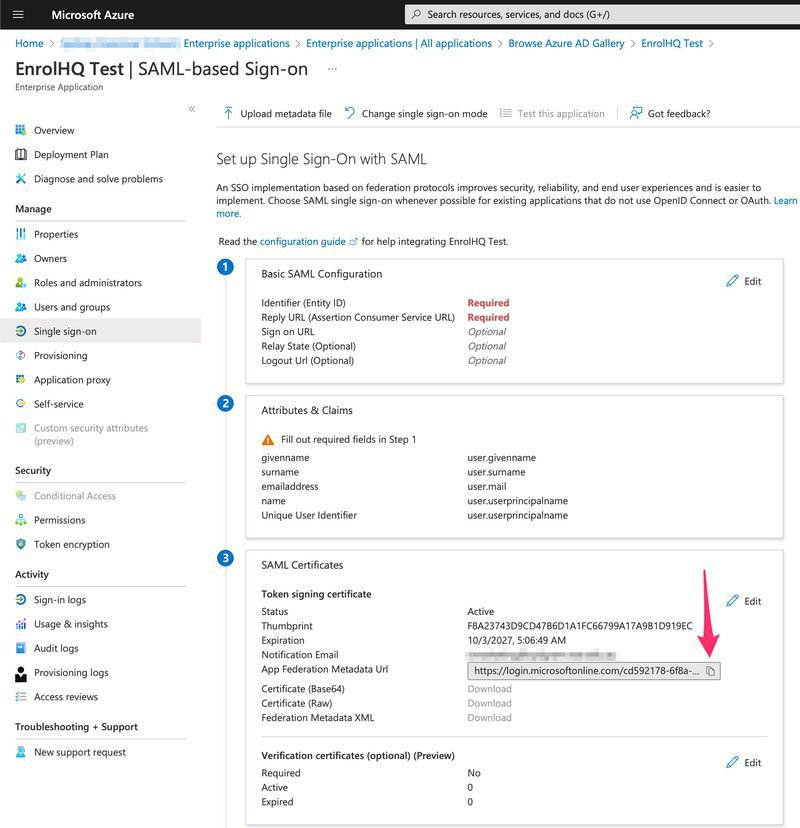
1e) You'll see a screen with the default SAML configuration, copy the "App Federation Metadata URL" to be pasted into EnrolHQ
Step 2: Enable SAML in EnrolHQ
Now log in to EnrolHQ with your username/password at your school's EnrolHQ dashboard e.g enrol.school.state.edu.au/dashboard/ and authenticate using SMS if required. Please note that you will need to have the 'admin' role assigned to your user to be able to enable SAML.
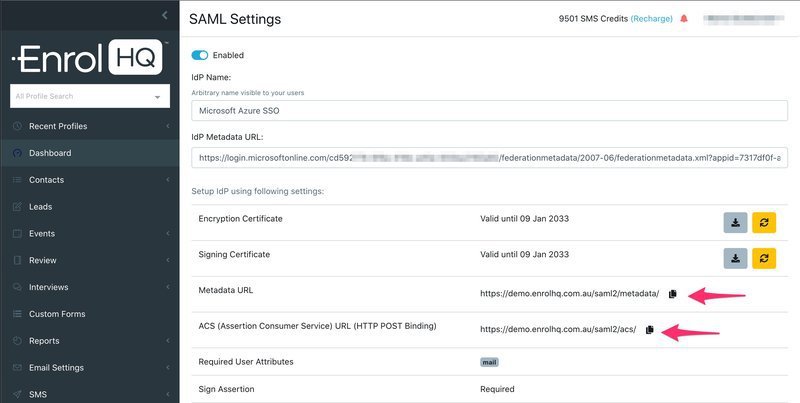
When you have logged in to EnrolHQ, in the left hand menu, go to "User Management" near the bottom and then click on "SAML Settings". You will need to toggle it to Enabled, call it "Microsoft Entra SSO" or "Entra AD SSO" so that school staff will see a 'Log in using Entra AD SSO" link when they next to go to EnrolHQ.
Paste the "App Federation Metadata URL" from Microsoft Entra (previously Azure) into the IdP Metadata URL in EnrolHQ and Save.

Once you save this you will now see a screen with EnrolHQ's SAML settings - it will have a metadata URL and an ACS URL that you will need to copy and paste back into Azure:
Step 3: Add the SAML URLs to the Microsoft Entra (previously Azure) Enterprise Application
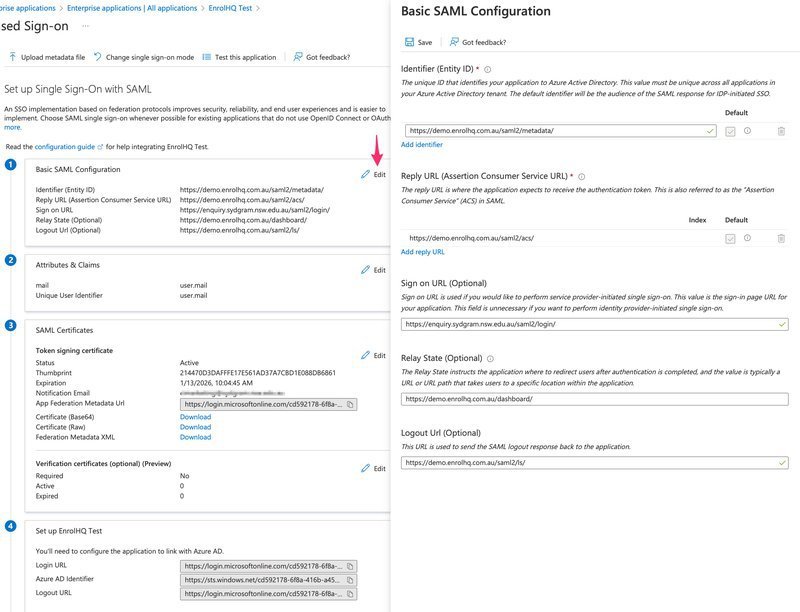
The EnrolHQ portion of the configuration is now complete. Go back to Microsoft Entra (previously Azure) to the "Set Up Single Sign-on" page and click "Edit" in the top right corner of the Basic SAML Configuration box. You will get a slide-out from the right
3a) Copy the metadata URL from EnrolHQ and paste into the Identifier (Entity ID) in Microsoft Entra (previously Azure)
3b) Copy the ACS URL from EnrolHQ and paste into the Reply URL (Assertion Consumer Service URL) in Microsoft Entra (previously Azure)
3c) The Sign On URL is your schools EnrolHQ dashboard login URL e.g https://enrol.school.state.edu.au/dashboard/ where you use your school domain.
3d) The Relay State (Optional) URL is your schools EnrolHQ dashboard login URL (same as above)
3e) Logout URL is https://enrol.school.state.edu.au/saml2/ls/ where you replace the example domain with your school domain.
Step 4: Setup Claims and Attributes in Microsoft Entra (previously Azure)
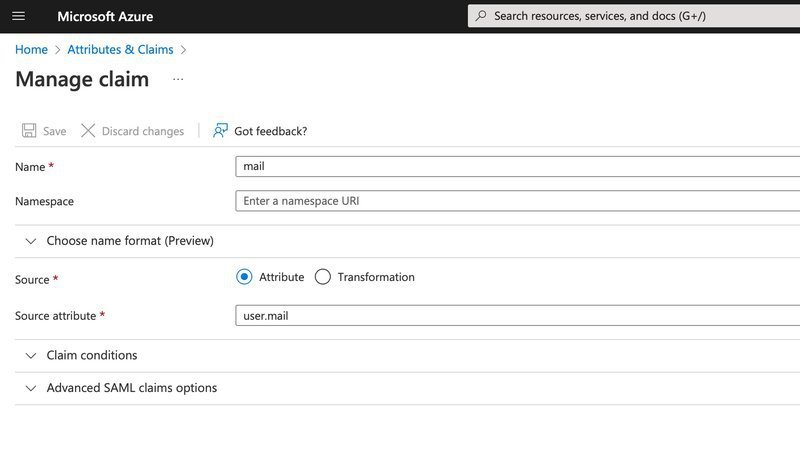
EnrolHQ matches the EnrolHQ user email address with the email address of user logging-in via Microsoft Entra (previously Azure) AD. There is no auto-provisioning of accounts for security purposes. You will need to set-up the user on the EnrolHQ side and put them in the correct roles. Therefore the only claim required is 'mail' with no namespace which should be mapped to 'user.email'.
4a) First delete the default claims including givenname, name etc. Keep the one that has user.email as the value.
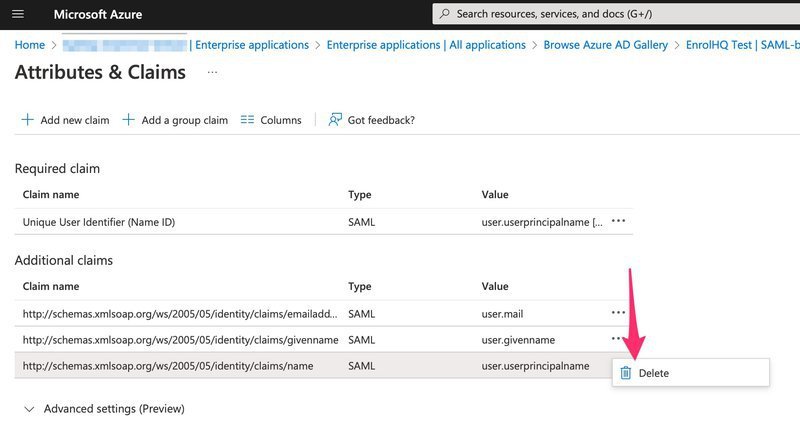
4b) Now edit the Claim with the value "user.email". You want to remove the namespace completely, and rename the 'Name' to be just 'mail'. The source attribute remains as 'user.mail'
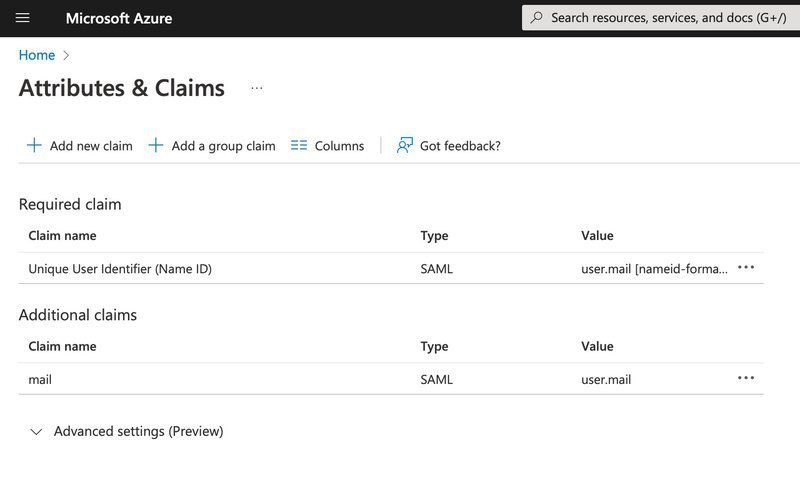
4c) You will also need to edit the Unique User Identifier so that it uses 'user.email' as it's source attribute. Your final 'Attributes & Claims' screen should look like this:
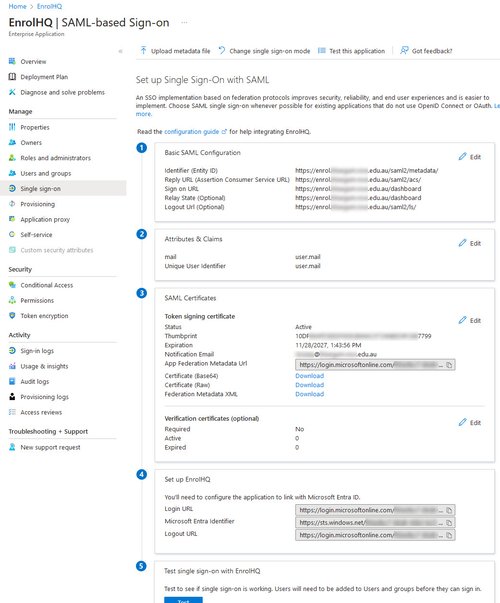
4d) Finally your Microsoft Entra (previously Azure) AD Config should look like this:
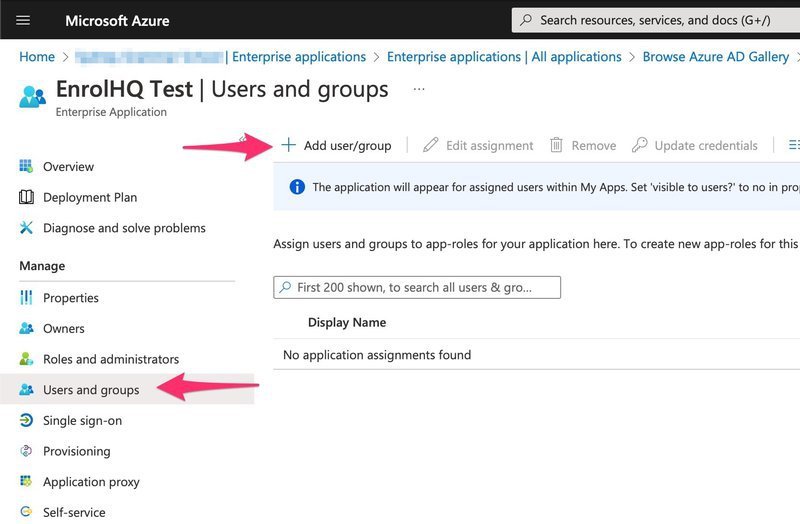
Step 5: Add Users and Groups to the EnrolHQ Enterprise App in Azure
You will need to define a Group of people who have access to EnrolHQ using Microsoft Entra (previously Azure) AD. Remember, because there is no auto-provisioning of staff accounts in EnrolHQ from SSO Identity Providers, your SSO will not work until you have added the staff that require access to EnrolHQ to the Enterprise App Users and Group in Microsoft Entra (previously Azure).
Step 6: Test
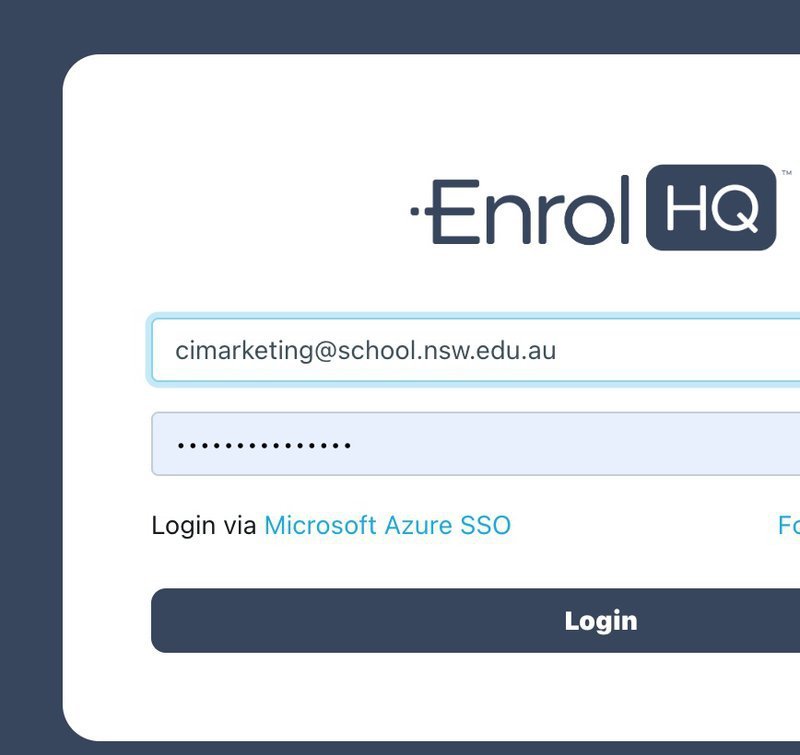
If all the above has been done, you will be able to go back to the EnrolHQ login screen and see the 'Login via Microsoft Azure SSO' link. Providing you have a user account that has been added to the AD Group and also exists in EnrolHQ this should take you to the Microsoft log-in screen and then allow you to log-in using your Microsoft Microsoft Entra (previously Azure) AD SSO credentials.
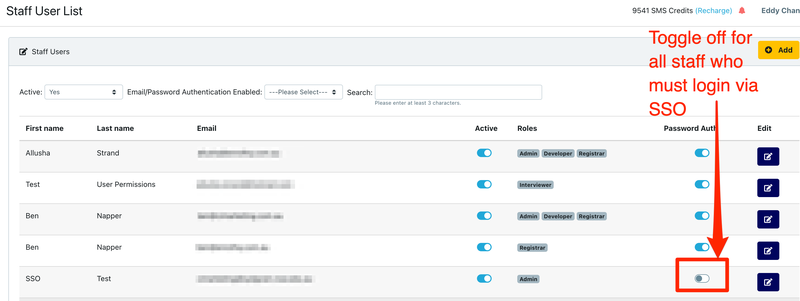
If your test is successful you will need to go back to EnrolHQ Users page to toggle 'Password Auth' off to force those users to use their Single Sign-On credentials going forward.
The most common error when testing is “Access Denied”. This occurs when the email addresses do not match. eg admissions@myschool.state.edu.au in stead of the user name user@myschool.state.edu.au
Please check that the email address setup in EnrolHQ User Management > Users matches the login details you are testing for using SSO.
If you have any questions about this please do not hesitate to get in touch with us via support@enrolhq.com.au