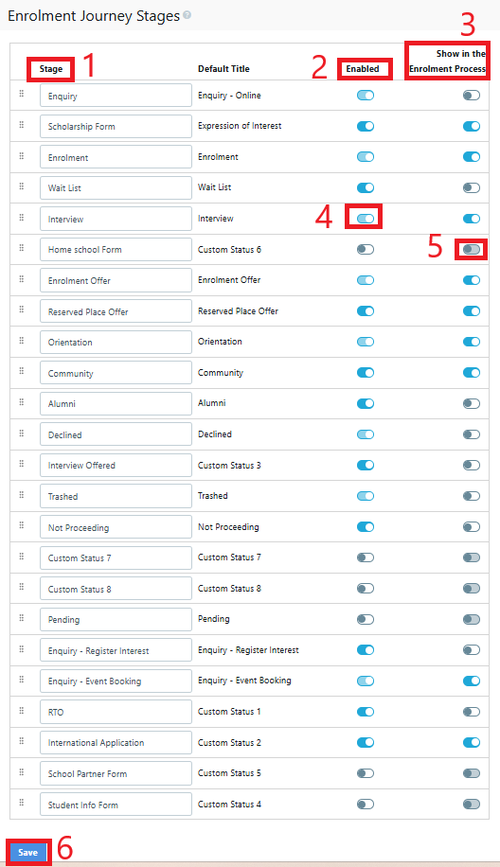
This section allows schools to make changes to their enrolment process by activating, deactivating, renaming and changing the position of different enrolment stages.
What is the purpose of Enrolment Journey Stages?
This includes the main stages: enquiry - tour booking - application - interview - offer - orientation and community and also the additional substages such as expression of interest - pending - waitlist etc.
Trashed This stage is where the duplicate profiles are moved once the details have been merged. These numbers are excluded from all reporting. As part of onboarding when you create test profiles they should be moved to trashed once you are 'LIVE'
The Enrolment Journey is fully customisable. You can activate, move, change and deactivate stages are required - it is important to ensure that if you make changes any profiles in that stage would nee to be moved using Bulk Actions

1 Stage - Name of the Journey Stage (Make it your own language used at the school) the default name is shown in the next column
2 Enabled - this makes the stage available in the dashboard
3 Show in Enrolment Process - this makes the stage visible in the parent dashboard Note: if the stage is disabled the previous enabled stage is shown on the parent dashboard
4 Enabled toggle - some stages cannot be turned off
5 Parent dashboard - some stages cannot be turned off
6 You must save for the changes to have effect
Activating a stage will automatically open a new window in the left contacts menu.
Changes in position or name will be reflected in the contacts menu and the status dropdown in the student's detailed view.

There are 8 additional custom statuses at the bottom, off by default that schools can use at their discretion.
If you use one of the custom stages, these will not be linked to your SIS status sync, unless you specifically ask us to map them for you. Label changes do not affect the mapping of the sync as we use ID's for each status.